This post is part of a series
- Project Organization - Beyond Helix
- "Sitecore Flow" - The benefits of versioning your Sitecore environments
Put aside everything you know about using git because this post explores a completely untraditional method. This method enables you to roll back failed deployments in seconds. Additionally, it automates the clean up of obsolete files.
Acknowledgement
This post is based on the 2017 Sitecore Symposium presentation by Chris Nielsen titled "A Day in the Life of a Sitecore Developer".
The standard devops process
In the standard devops model, a build tool like Team City or VSTS Build Agent builds your solution, which produces build artifacts. Then these build artifacts are deployed to your environments using a release tool like Octopus or VSTS Release Agent. The entire build-and-deploy process can take as long as an hour, depending on the number of build steps (running gulp tasks, running unit tests, etc), and the quantity and size of the packages that need to be deployed. Of the two, the deployment portion is usually the bigger time sink.
What happens if a critical bug is discovered after the deployment completes? Obviously, you need to rollback to a stable version. You probably don’t need to rebuild the solution since previous versions of build artifacts get stored in the build tool. But you certainly need to re-deploy, and your front end will linger in error state until the re-deploy completes.
There’s another approach to rolling back that saves your site from being down for the half hour or so. You can be up and running on a previous stable version in seconds.
Instantaneous rollbacks
It’s a very simple concept - if you use git to take a snapshot of your sitecore instance after every deployment, then rolling back becomes a matter of checking out the previous commit. So a full rollback can be achieved in seconds.
How it works
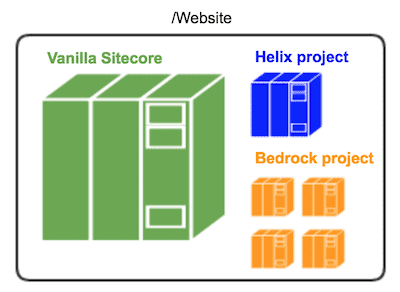
Whether we are implementing this for a developer machine or a higher environment like QA, or even PROD, the steps are the same. I will outline a sample setup for a solution that adheres to the Sitecore -> Bedrock -> Helix organization described in the last post.
1. Install Sitecore
Follow you usual process, no matter if it’s SIM, the .exe installer, or something else.
2. Set up a local repo on the Sitecore server
Go to the /Website directory on the file system and create a new repo. This repo is local to the machine on which it’s created. It does not pull from or push to a remote source. This is a very important distinction. People are quick to throw their hands up at the idea of installing git in a higher environment because of perceived security concerns. But security is not an issue because the repository never gets connected to the outside world. It’s local to the machine on which it’s created.
3. Take a snapshot of Vanilla Sitecore
Checkout a new branch called sitecore. Stage everything in /Website that was added by the Sitecore installation, and commit. The sitecore branch now has a snapshot of your Vanilla Sitecore instance. You can come back to this point at any time by checking out this branch with git. Any upgrades or changes to the base Sitecore installation should be done exclusively on this branch.
4. Take a snapshot of third party dependencies
Checkout a new branch called bedrock. Deploy the Bedrock project (this contains 3rd party code like support patches and Marketplace modules) and commit all the files that were added or updated. The bedrock branch now has a snapshot of your Vanilla Sitecore instance with 3rd party modules. You can come back to this point by checking out this branch with git. Any upgrades or changes to the set of 3rd party modules should be done exclusively on this branch.
5. Take a snapshot of your custom solution
Finally, checkout a new branch called project. Deploy your custom solution and commit all the files that were added or updated to the new branch.

6. Manage upgrades
From here on out, all upgrades to Sitecore, the third party modules, or your custom solution should be done on their respective branches. sitecore branch should always be merged into bedrock. And bedrock branch should always be merged into project.
It ends up looking like this:
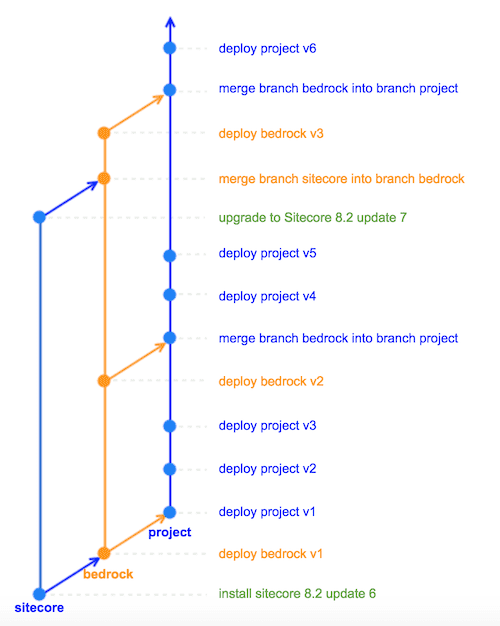
This model allows you to rollback to previous versions in the time that is takes to checkout a branch (a couple of seconds). I call it "Sitecore Flow".
But wait, there’s more!
There is a second benefit to versioning your Sitecore instance with git - easy clean up of obsolete files.
You remember that one time when someone on your team renamed a config file and forgot to delete the old one from a higher environment? Then that environment behaved differently from all the others and no one knew why until hours of debugging finally exposed the rogue file? We can protect against this scenario by always reseting to the parent branch (and thereby cleaning up the filesystem) before performing upgrades.
Automate it
Of course no one wants to have to RDP to a server before every deployment to manage this git jumping manually. And the good news is that no one has to - this can be completely automated (happy dance).
You are probably already executing some powershell scripts as part of your deployment process. Octopus is super powershell-friendly with its built-in hooks for PreDeploy, Deploy, PostDeploy, and DeployFailed scripts. We can run command-line git from powershell to do what we need.
For example, to upgrade a 3rd party module, you could set up something like this:
- PreDeploy: reset filesystem to the
sitecorebranch - Deploy: perform upgrade on the
bedrockbranch - PostDeploy: checkout
project, mergebedrockintoproject - DeployFailed: discard changes, checkout
project
Notice that if the deployment fails for whatever reason, your site will not go down because you will end up jumping to the last successful version.
Bon Appétit!